Hi all,
I am so happy to share my first tutorial with you at Yumi & Fumi!!
Do you like the card above?? Would you like to make one??
It is a tri shutter card.
It is fun to make, I have seen different tutorials in blog land and this is mine.
You will need the following:
cardstock of choice size A 4 ( 29, 5 cm x 21 cm )
design papers
scissors
glue
ruler
pencil
cutter
scoreboard ( I have used my multi-pro from crafter's companion )
stamps and decorations of choice
step 1:
Out of the A4 cardstock you will need to lightly mark
the long side at 5cm - 10 cm - 19,5 cm - 24, 5 cm
the short side at 4 cm - 11 cm
the remaining piece needs to be removed
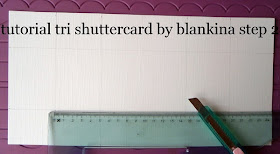
step 2:
this is what you get
now cut along the red lines ( see step 1 )
step 3:
score the lines
up fold and down folds
( see step 1 )
step 4:
your card should look like this afterwards
step 5:
bend the folds
step 6:
cut design paper pieces to decorate the tri shutter card
9, 5 cm x 6 cm = 2 pieces
9 cm x 6 cm = 1 piece
9 cm x 3, 5 cm = 2 pieces
4,5 cm x 3, 5 cm = 8 pieces
( I have used two different papers, 4 pieces of design paper and
4 pieces of marbled papers which I have embossed )
step 7:
glue it onto the tri shutter card like this
step 8:
I have embellished the tri shutter card with Yumi & Fumi stamps
and some dies and ribbon
What do you think??
the closed tri shutter card fits into a normal C 6 envelope
my recipe:
stamp Yumi & Fumi ( here ), swirls stamp Kaisercraft, floral stamp Marianne Design,
sentiment stamp The Greeting Farm, hexagon die Nellie Snellen, butterfly die Sizzix,
design papers Marianne Design, foil art cardstock , embossing folder, ribbon, strass
Hope you have enjoyed my little tutorial, is it all clear to you?
If you have questions or comments do not hesitate to leave a message on my BLOG.
Cannot wait to see your cards!
THANKS!


I love this card tutorial Blankina. Great DP and look how you placed the images....adorable!
ReplyDeleteWin/Win for us here at Y&FH!
Love your card!
ReplyDeleteAwesome shutter card!
ReplyDeleteCiao Anna come sempre sei bravissima..adoro i colori e il timbro che hai usato..bellissimo
ReplyDeleteHugs
This is amazing Blankina! Love the color combo and how you put Y&F into a octagon shape =)
ReplyDeleteGreat tut, Blankina! I've always wanted to learn how to do that!
ReplyDeleteOh Blankina!! This is gorgeous! Its even more beautiful in person!! Great tutorial!!!
ReplyDelete