Showing posts with label tutorial. Show all posts

Thursday, January 16, 2014

Showcasing AJ

Hi everybody!

It's Sheena here with this week's edition of Showcase Thursday at Yumi & Fumi Handmade.

When I was looking through my Y&FH stamps, I realized that our beloved AJ doesn't get nearly as much face time here on the blog as he could. So I figured I would treat you all to a little tutorial on how I colour this cutie-pie!


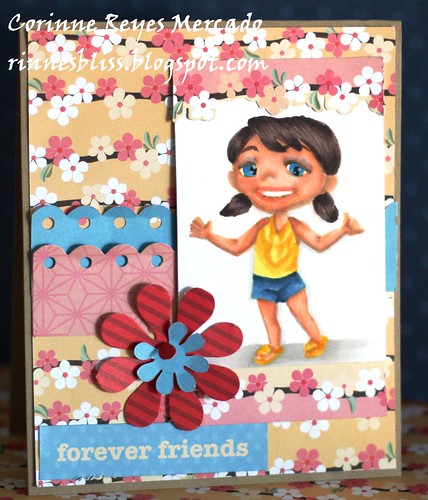
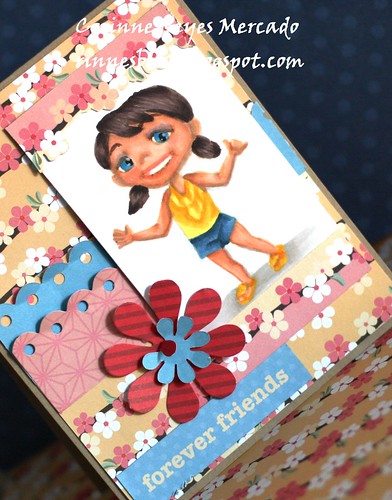
Here's the finished card, featuring AJ from the Back to School series.


And, for those who are interested, continue to scroll on down a step by step photo tutorial on how I coloured his skin and hair.


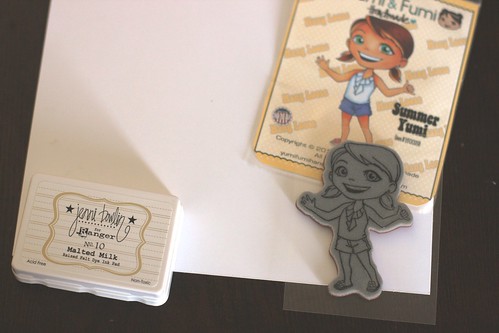
First off - I grab darker tones for his skin (Copic E11, E13, E15, E93, R20) and my usual combination for darker brown hair (Copic E55, E57, E59, E47, E49). Then I get to work layering on the colours.

Apologies for all the photos but you REALLY don't want to watch an hour long video of me colouring. Trust me!


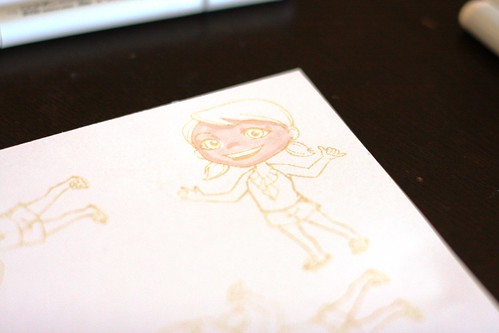
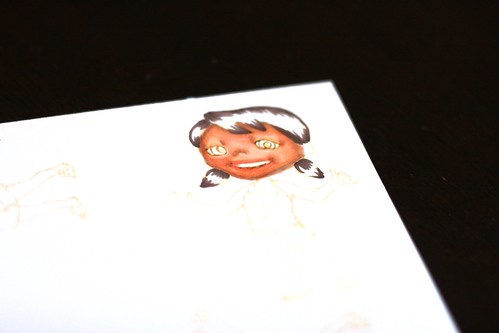
Step 1: Base layer of E11. Don't be concerned about getting the colour all even. The layers of shading will all work out in the end.


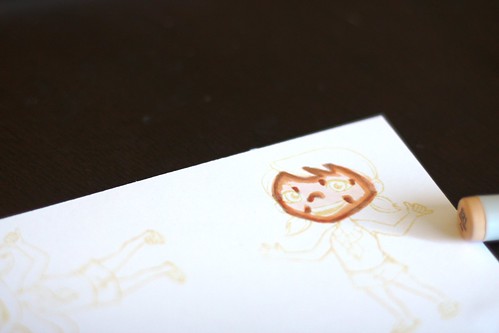
Step 2: Add a bit of shading around the edges with E13.


Step 3: Add a little MORE shading around the edges with E15.


Step 4: Add a bit of glow in his cheeks with R93. Since AJ is being coloured with a little darker skin tone, I actually went back and added a bit of R20 on top of the R93.


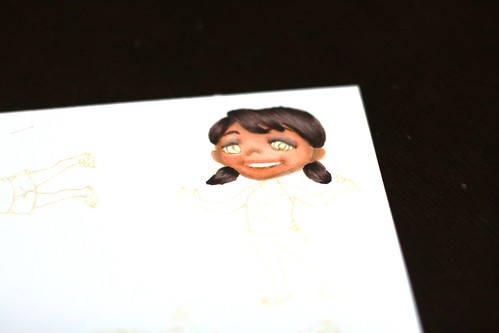
Step 5: And here is where we start to smooth out the sharper lines on the shading done so far - with E13.


Step 6: A little more blending with E11.


Step 7: Switching between E11 and E13 to get just the right amount of blending and his face is done.


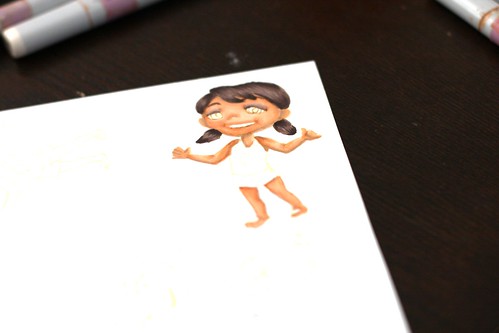
Step 8: Moving on to his hair, I lay down a base of E55. Again, not concerned about evenness as  I will be layering on the colours.


Step 9: To get the curly/kinky look in his hair, I add my layers of colour with random squiggles - first with E57.


Step 10: Then with E59. Remember to use a light hand!


Step 11: Add some darker squiggles with E49.


Step 12: A little more E47


Step 13: And back again with E49 and E47 to add the final touches


So, for those of you who might be a little unsure or nervous about colouring our sweet AJ, I hope that this tutorial has shed some light on just how easy it is to do darker skin tones and curly hair!

If you find yourself inspired to ink up AJ anytime soon (or have done so in the past), feel free to leave a comment with a link to where we can check out your creation OR post your creation on our Facebook page or, if you are on Splitcoaststampers, tag your creation with yumifumi so it shows up in our company gallery! We would love to check out how everyone is colouring up this sweetie!

Thursday, October 10, 2013

A Thursday Throwback and Tutorial with Yumi and Fumi

Happy Thursday Everybody! It's Sheena of Team Fumi here today sharing a little project featuring our namesake Yumi & Fumi stamps from the first release.

Now, most of the time, I make cards. But every now and then I branch out and do a little altering. One of my favourite (and practical) objects to alter are notebooks. Despite being a techie, I DO like having written reminders of my to-do lists or, when travelling, a little journal to record those memorable moments.

Since I AM heading out on a little trip next week, I was inspired to create and share with you these altered miniature composition notebooks. They are perfect for writing down your packing list, important contact numbers and for quickly journalling all the fun anecdotes to go with your vacation photos for scrap-booking once you return home.


Supply List:

  • miniature composition notebook (from your local dollar store or office supply store). These measure approximately 3.25 x 4.5 inches
  • coordinating patterned papers, cut to fit the covers of the notebooks. You will need four pieces per notebook. Note that the pieces you will use for the inside covers should be cut just a fraction narrower than the cover (or you can trim after adhering with a craft knife). 
  • extra paper from which to punch page tabs
  • coordinating ribbon: two pieces. One for the cover (measure 1.25 inches longer than the cover to give room to adhere) and one for a placeholder (measure 2.5 inches longer than the cover to adhere and protrude from the notebook)
  • double-sided tape, small glue dots
  • coloured, stamped image of your choice
  • any other embellishments you might wish to add
  • corner rounder punch (or craft knife) if your notebook has rounded edges
  • tab punch (or any other die cut/punch to make the tabs to divide your  notebook into sections)
  • stamp and/or die cut to create a bookplate for the inner cover

Step 1: Gather your notebooks and rubber stamps.


Step 2: Cut your patterned papers down to size, rounding the edges if necessary. If the pattern on your paper clearly has a directional orientation (like my text paper), be sure you round the edges correctly!


Step 3: Be generous with the two-sided tape on the back of your papers to keep the edges from curling up.


Step 4: Line up the edges of the papers with the edges of your notebook and apply, pressing firmly to adhere.


Step 5: Cover the edges of the paper nearest the spine binding with the smaller pieces of ribbon. I like using just a couple of tiny glue dots to adhere the ribbon.


Step 6: Cut your coordinating papers for the inside covers. Again, remember to round the correct edges of the papers if they are directional. For these, I did not have to worry so much about that.


Step 7: I like the added touch of a little book-plate on the inside cover so you can write your name and contact info in case you lose your notebook OR so you can write the location and date of your trip!


Step 8: Before you adhere the papers to the inner cover, you will want to affix the ends of the ribbons from the cover AND one end of your place-holder ribbon (to the top edge of the back cover).


Step 9: Line your inner covers with the patterned papers.


Step 10: Punch out the tabs for dividing your notebook into sections from your left-over papers or additional coordinating papers. Score at the half-way point and apply double-sided tape to the insides of the tabs.


Step 11: Add your tabs to the pages of your notebook.


Step 12: Decorate the front of your notebook! I kept these notebooks nice and simple, with images coloured to match the papers and a little tab, but you could add assorted embellishments or ephemera to suit your taste.


So, there you have it! I'm glad you made it to the end of my detail heavy tutorial. If you are inspired to make your own altered notebook OR to create a project using my choice of throwback images (our very own Yumi & Fumi) be sure to share them on the Yumi & Fumi Handmade Facebook Fan page or to leave a comment on this post with a link to your own blog post or online gallery!

As always, thanks for taking the time to visit us here at Yumi & Fumi Handmade!

Thursday, October 3, 2013

No Black Lines Tut.

Good Thursday morning, everybody! It's Corinne, and it's my turn to show you the no-lines coloring tutorial! It's super fun to do, but also kinda difficult (at first)! You just take those black lines for granted, don't ya? I love how it looks like a painting in the end, but boy, it's quite challenging!

IMG_9436

Summer Yumi is featured here, and although it is already Fall, I'm trying to get the most out of this flipflop wearing beauty!

The first thing you have to do is get a light colored ink to stamp with.  I chose Malted Milk from Ranger's Jenni Bowlin series.                                                                                                                                                                                                                                                                                                                                                

IMG_9420

Just stamp the image as usual, making sure you've got plenty of light in the room. 

IMG_9421

Go ahead and apply color as if you were coloring the image.  Make sure you add the usual shadows and shadings. 

IMG_9422

For example, I gave her eye lids, a contoured face, and full cheeks. 

IMG_9423

Blend really well.  If you have to, go ahead and keep an image of the black line version close at hand so you know where to put the colors next. 

IMG_9424

For me, the most difficult part of the no-lines coloring method is doing the hair.  

IMG_9426

I could never get the shadows and highlights done exactly to my liking.

IMG_9429

I also like to add a bit of "make-up" as eyeshadow. 

IMG_9430

Then, do the rest of the body parts, making sure you keep in mind where your light source is. 

IMG_9431

Finish up the clothing and details and voila! 

IMG_9433

I hope you enjoyed this tutorial.  It's always refreshing to try something new :). 

IMG_9437

Have a wonderful day!

Corinne
Team Yumi

Thursday, August 29, 2013

Tri shutter card tutorial by Blankina


Hi all,

I am so happy to share my first tutorial with you at Yumi & Fumi!!
Do you like the card above?? Would you like to make one??
It is a tri shutter card.
 It is fun to make, I have seen different tutorials in blog land and this is mine.

You will need the following:

cardstock of choice size A 4  ( 29, 5 cm x 21 cm )
design papers
scissors
glue
ruler
pencil
cutter
scoreboard  ( I have used my multi-pro from crafter's companion )
stamps and decorations of choice

step 1:
Out of the A4 cardstock you will need to lightly mark

the long side at 5cm  -  10 cm  - 19,5 cm  - 24, 5 cm 
the short side at 4 cm - 11 cm 
the remaining piece needs to be removed

step 2:
this is what you get 
now cut along the red lines ( see step 1 )

step 3: 
score the lines
up fold and down folds
 ( see step 1 )

step 4:
your card should look like this afterwards

step 5:
bend the folds 

step 6:
cut design paper pieces to decorate the tri shutter card

9, 5 cm x 6 cm  = 2 pieces
9 cm x 6 cm = 1 piece
9 cm x 3, 5 cm = 2 pieces
4,5 cm x 3, 5 cm =  8 pieces 
( I have used two different papers, 4 pieces of design paper and 
4 pieces of marbled papers which I have embossed ) 

step 7:
glue it onto the tri shutter card like this

step 8:
I have embellished the tri shutter card with Yumi & Fumi stamps
 and some dies and ribbon
What do you think??


the closed tri shutter card fits into a normal C 6 envelope

my recipe:
stamp Yumi & Fumi ( here ), swirls stamp Kaisercraft, floral stamp Marianne Design,
sentiment stamp The Greeting Farm, hexagon die Nellie Snellen, butterfly die Sizzix,
design papers Marianne Design, foil art cardstock , embossing folder, ribbon, strass

Hope you have enjoyed my little tutorial, is it all clear to you?
 If you have questions or comments do not hesitate to leave a  message on my BLOG.

Cannot wait to see your cards!
THANKS!